Who doesn’t love full stack development?
When it comes to Next.js, which allows the whole full stack development process with just the knowledge and power of JavaScript. You can build server-side components along with the use of React for the frontend, as you know, React is the love of front end developers. So who’s waiting more? Let’s start already…
In this blog, we are going to dive deep into the Next.js world, covering its main features and benefits. I’m going to guide you through creating a new Next.js project, building dynamic pages and components, and fully leveraging built-in features like server-side rendering and static site generation.
Table Of Contents
What is Next.js?
Next.js is a popular React framework designed to help make the process of building full-stack web applications easier. It provides a set of features and conventions in creating production-ready websites or applications.
A React Framework
At its core, Next.js is a React framework, which means it uses all the power that React offers in building user interfaces. Just to build the frontend web part makes it a very solid way to make dynamic, interactive web experiences; this is the real beauty from a programmer’s perspective. Next.js goes beyond just React, adding some extra features and optimizations to fit into production environments.

Server-Side Rendering (SSR)
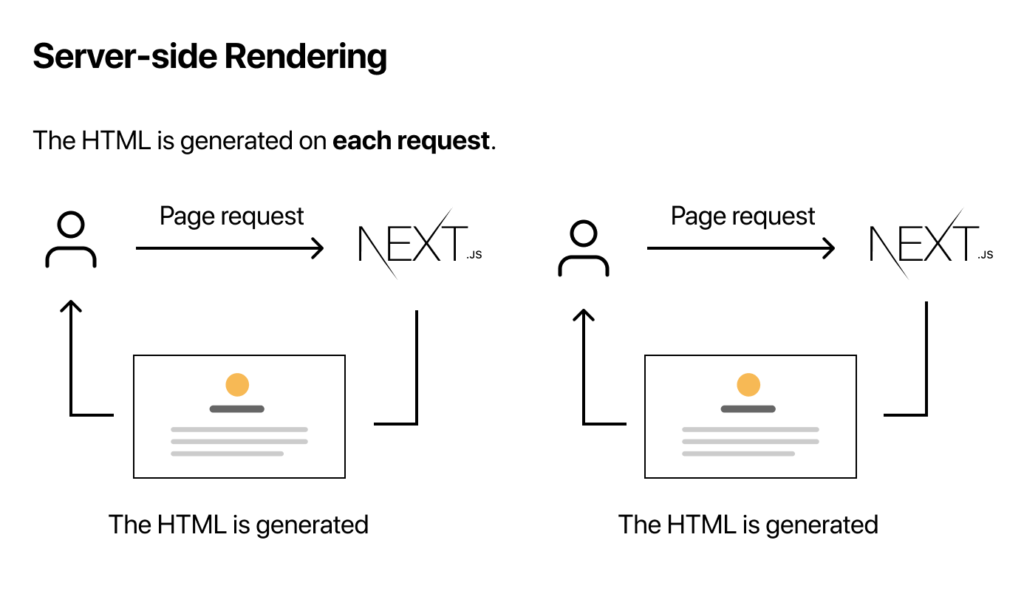
One of the major strengths of Next.js is Server-Side Rendering, meaning components in your application are rendered on the server before being sent to the client. Some of the benefits of this approach are:
Better SEO: SSR pages can be crawled and indexed by search engines easily, in turn giving them a better ranking on search engines (more good rankings = more clients = more money yuhuu!).
Faster initial page load: SSR can significantly reduce the time it takes for users to see the initial content of a page.
Better interactivity: SSR can contribute to better perceived performance of your app, especially for complex pages or those with lots of initial data.
File-Based Routing
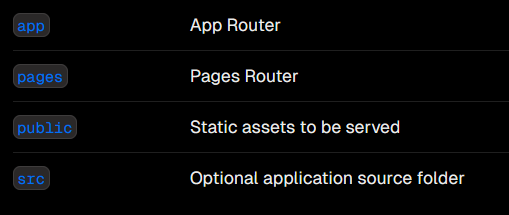
Next.js introduces a file-based routing system, which simplifies the process of defining routes in your application. By creating pages in specific directories (e.g., pages/about.js), Next.js automatically generates corresponding routes. This convention-over-configuration approach reduces the amount of boilerplate code and makes it easier to manage your application’s routes.
Core Features of Next.js
API Routes
Next.js provides a convenient way to create server-side APIs within your application using the built-in pages/api directory. This allows you to handle requests and return data in various formats, such as JSON, without needing to set up a separate API server.
Example:
// pages/api/hello.js
export default function handler(req, res) {
  res.status(200).json({ name: 'Amar Akbar Anthany' });
}
This API route can be accessed at http://your-app/api/hello.
Static Site Generation (SSG)

Static Site Generation (SSG) is a technique where Next.js pre-renders your application’s pages at build time. This results in static HTML files that can be served directly to the client, providing excellent performance and SEO benefits.
When to use SSG:
Pages with content that changes infrequently (e.g., blog posts, product pages)
Applications where performance and SEO are critical.
Example:
// pages/blog/[slug].js
import { getStaticPaths, getStaticProps } from 'next/future';

export async function getStaticPaths() {
  const paths = [
    { params: { slug: 'hello-world' } },
    { params: { slug: 'another-post' } },
  ];
  return { paths, fallback: false };
}

export async function getStaticProps({ params }) {
  const post = await fetchPostData(params.slug);
  return { props: { post } };
}

function BlogPost({ post }) {
  // ...
}
Incremental Static Regeneration (ISR)
Incremental Static Regeneration (ISR) is the ability to update static pages with dynamic data but without a full rebuild. This is very useful for pages that need updates all the time but, in general, do not require real-time updates.
When to use ISR:
Pages with frequently updated content (e.g., news articles, product listings)
Applications where performance and freshness are important.
Example:
// pages/blog/[slug].js
import { getStaticPaths, getStaticProps, revalidate } from 'next/future';

export async function getStaticPaths() {
  // ...
}

export async function getStaticProps({ params }) {
  // ...
  return { props: { post }, revalidate: 10 }; // Revalidate every 10 seconds
}
Hybrid Rendering
Next.js supports hybrid rendering, which allows you to combine SSR, SSG, and Client-Side Rendering (CSR) within a single application. This provides flexibility in handling different use cases and optimizing performance based on your specific requirements.
Building a Basic Next.js App
Creating a New Project
- Install Node.js and npm (or yarn): Ensure you have Node.js and either npm or yarn installed on your system. You can download them from the official Node.js website.
- Create a new Next.js project: Open your terminal and run the following command:
npx create-next-app@latestReplace my-next-app with your desired project name. This will create a new Next.js project directory with the necessary files and dependencies.
This kind of response will appear on your terminal:
(Make sure that Node.js is installed on your device perfectly.)
What is your project named? my-app
Would you like to use TypeScript? No / Yes
Would you like to use ESLint? No / Yes
Would you like to use Tailwind CSS? No / Yes
Would you like your code inside a `src/` directory? No / Yes
Would you like to use App Router? (recommended) No / Yes
Would you like to use Turbopack for `next dev`?  No / Yes
Would you like to customize the import alias (`@/*` by default)? No / Yes
What import alias would you like configured? @/*
Tick Yes, as per your needs (Make sure to tick yes to everything after Tailwind CSS for this project)!!
Basic Components and Pages
1. Navigate to the project directory: Open your terminal and navigate to the newly created project directory:
cd my-next-app
2. Create a component: Inside the components’ directory, create a new file (e.g., Header.js) and
define your component using React function components:
// components/Header.js
function Header() {
  return (
    <header>
      <h1>My Next.js App</h1>
    </header>
  );
}

export default Header;
3. Create a page: Inside the pages directory, create a new file (e.g., index.js) to represent the home page:
// pages/index.js
import Header from '../components/Header';

function HomePage() {
  return (
    <div>
      <Header />
      <p>Welcome to my Next.js app!</p>
    </div>
  );
}

export default HomePage;
Routing
Next.js automatically handles routing based on the file path within the pages directory. For example, a file named pages/about.js will create a route at /about.
To start your development server:
npm run devThis will start the development server, and you can access your application at http://localhost:3000. You should see the content from your HomePage component.
Note – You can also install yarn and use it for running your application, as it’s faster and smoother!
Building a Simple Blog with Next.js

Create a Blog Post Component
import { useRouter } from 'next/router';

function BlogPost({ post }) {
  const router = useRouter();
  const { title, author, content } = post;

  return (
    <div>
      <h1>{title}</h1>
      <p>By {author}</p>
      <p>{content}</p>
      <button onClick={() => router.back()}>Back</button>
    </div>
  );
}

export default BlogPost;
Fetch Data Using getStaticProps
import BlogPost from '../../components/BlogPost';
import { getStaticPaths, getStaticProps } from 'next/future';

export async function getStaticPaths() {
  const posts = await fetchPosts(); // Replace with your data fetching logic
  const paths = posts.map((post) => ({ params: { slug: post.slug } }));
  return { paths, fallback: false };
}

export async function getStaticProps({ params }) {
  const post = await fetchPost(params.slug); // Replace with your data fetching logic
  return { props: { post } };
}

function BlogPostPage({ post }) {
  return <BlogPost post={post} />;
}

export default BlogPostPage;
Note – You can use the slug whatever you want like for e.g.- “How To make pancakes?“.
Dynamic Routes
The [slug].js file in the pages directory creates a dynamic route that accepts a slug parameter.
This allows you to display different blog posts based on the slug.
Pagination
import { useState, useEffect } from 'react';
import BlogPostList from '../../components/BlogPostList';

function BlogPage() {
  const [posts, setPosts] = useState([]);
  const [currentPage, setCurrentPage] = useState(1);
  const [postsPerPage] = useState(10);

  useEffect(() => {
    const fetchPosts = async () => {
      const fetchedPosts = await fetchPostsData(currentPage, postsPerPage); // Replace with your data fetching logic
      setPosts(fetchedPosts);
    };

    fetchPosts();
  }, [currentPage, postsPerPage]);

  const handlePageChange = (page) => {
    setCurrentPage(page);
  };

  return (
    <div>
      <BlogPostList posts={posts} />
      {/* Add pagination components here */}
    </div>
  );
}

export default BlogPage;
Remember to replace the placeholder functions fetchPosts, fetchPost, and fetchPostsData with your actual data fetching logic, which might involve making API calls to a backend or a headless CMS.
Conclusion
Next.js enables you to build highly efficient full-stack web applications. Using its key features like server-side rendering, static site generation, API routes, and file-based routing, one can develop applications that are high performing, SEO-friendly, and developer-friendly.
Key benefits of using Next.js:
Improved performance: SSR and SSG provides faster initial page loads, enhancing the user experience.
- Better SEO: SSR makes it easier for search engines to crawl and index your content.
- Simplified development: Next.js’s conventions and it’s built-in features streamline the development process.
- Flexibility: Hybrid rendering allows you to choose the best approach for different use cases.
We encourage you to explore more of the Next.js further and experiment with its capabilities. By following the examples and best practices outlined in this article, you can create impressive web applications that meet the demands of modern users.
Have you tried using Next.js for your projects? Share your experiences, ask questions, or discuss your latest Next.js creations in the comments below.


