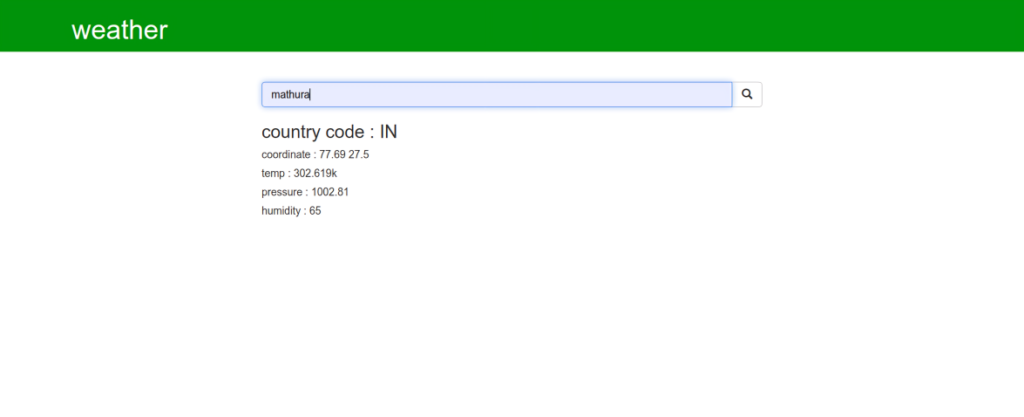
Building a weather app is a fantastic way to get into Django, a powerful Python-based web framework known for its clean, functional and fast development In this course we will introduce you way through the process of creating a weather app from scratch, using Django as a backend.
Why Choose Django for Your Weather App?
Django is a high-quality Python web framework that promotes fast development and clean, useful design. It’s perfect for building dynamic web applications, like a weather app that fetches real-time data from an API.
Getting Started: Basic Setup
Make sure you have Django installed before we begin. Otherwise, you can pip:
pip install djangoStep 1: Create and Navigate to Your Project Directory
Start by creating a directory for your project and login:
mkdir weather
cd weather
Step 2: Start the Django Server
Start by creating a directory for your project and continue:
mkdir weather
cd weather
Step 2: Start the Django Server
Once you are in your project directory, you can start the Django development server:
python manage.py runserverTo confirm that the server is running, open your web browser and go to http://127.0.0.1:8000/. You can stop the server at any time by pressing Ctrl + C in your terminal.
Implementing the Weather App
Step 3: Create a New Django App
Create a new app called main:
python manage.py startapp mainNavigate into the main folder:
cd mainCreate the templates/main/index.html file in this folder. This is where your front-end code resides.
Step 4: Set Up the Project Structure
Open your project folder using a text editor of your choice. Your directory structure should now look something like this:
weather/
│
├── main/
│   ├── migrations/
│   ├── templates/
│   │   └── main/
│   │       └── index.html
│   ├── __init__.py
│   ├── admin.py
│   ├── apps.py
│   ├── models.py
│   ├── tests.py
│   ├── views.py
│   └── urls.py
│
├── weather/
│   ├── __init__.py
│   ├── settings.py
│   ├── urls.py
│   └── wsgi.py
│
└── manage.py
Step 5: Update settings.py
Add your main app to the INSTALLED_APPS section in settings.py:
INSTALLED_APPS = [
    ...
    'main',
    ...
]
Step 6: Configure URLs
Edit the urls.py file in your main project folder (weather/urls.py):
from django.contrib import admin
from django.urls import path, include

urlpatterns = [
    path('admin/', admin.site.urls),
    path('', include('main.urls')),
]
Now, create the urls.py file in the main app folder:
from django.urls import path
from . import views

urlpatterns = [
    path('', views.index),
]
Step 7: Define the View
Open views.py in the main folder and add the following code.
from django.shortcuts import render
import json
import urllib.request

def index(request):
    if request.method == 'POST':
        city = request.POST['city']

        # Replace 'your_api_key_here' with your actual API key
        source = urllib.request.urlopen(
            'http://api.openweathermap.org/data/2.5/weather?q='
            + city + '&appid=your_api_key_here'
        ).read()

        list_of_data = json.loads(source)

        data = {
            "country_code": str(list_of_data['sys']['country']),
            "coordinate": str(list_of_data['coord']['lon']) + ' ' + str(list_of_data['coord']['lat']),
            "temp": str(list_of_data['main']['temp']) + 'K',
            "pressure": str(list_of_data['main']['pressure']),
            "humidity": str(list_of_data['main']['humidity']),
        }
    else:
        data = {}

    return render(request, "main/index.html", data)
Step 8: Get Your API Key
To fetch weather data, an API key from OpenWeatherMap will be needed. You can get it by signing up to their website. Once you have the key, edit ‘your_api_key_here’ in the views.py file.
Step 9: Design the Frontend
Navigate to templates/main/index.html and design your frontend. This file will display the weather data fetched from the API.
Step 10: Migrate the Database
Make sure to apply the migrations before reinstalling the server:
python manage.py makemigrations
python manage.py migrate
Step 11: Run the Server
Finally, start the server to see your weather application running:
python manage.py runserverVisit http://127.0.0.1:8000/ in your browser to view your weather app.
Conclusion
Congratulations to you! You have successfully created a weather app using Django. This exercise not only helps you understand the basics of Django but also familiarizes you with working with external APIs. Whether you’re a beginner or looking to improve your Django skills, projects like this provide valuable hands-on experience.

