The MERN stack, which includes MongoDB, Express, React, and Node.js, is one of the most popular technology stacks for all-stack web applications. In this blog post, we will explore how to create a Summarizer Website using OpenAI’s powerful API using the MERNA stack. This project is perfect for developers interested in building high-performance applications that can process data collection, providing real-world examples of how to combine machine learning models with full stack applications.
Project Overview
Our Summarizer Website will accept the input from users, summarize it using the OpenAI GPT-3.5 model, and display the summary on the front-end. The entire project will be powered by a MERN-based framework, which will streamline the flow from user interface (React) to server-side applications (Node and Express) and store data in MongoDB.
Pre-requisites:
Before diving in, make sure you have the following:
- Basic knowledge of JavaScript and MERNA stack.
- API integration experience.
- The basic understanding of MongoDB is how to configure Mongoose for database applications.
Project Steps
Step 1: Generate an OpenAI API Key
To use the OpenAI API, you must first generate an API key:
- Go to the OpenAI forum and create an account.
- Once logged in, go to the API Keys section of the dashboard.
- Generate a new API key and save it securely for later use.
Step 2: Set Up the React App
Now, let’s create a new React app for the face:
npx create-react-app summarizer-app
cd summarizer-app
npm install axios
Create an .env file in the root of your React project with the following.
REACT_APP_BACKEND_URL=http://localhost:5000
Your folder structure should look like this:
summarizer-app/
├── node_modules/
├── public/
├── src/
├── .env
├── package.json
└── README.md
Step 3: Build the Frontend UI
In the src/App.js file we use the basic UI for the summary:
import axios from 'axios';
import React, { useState } from 'react';

const App = () => {
  const [inputText, setInputText] = useState('');
  const [summary, setSummary] = useState('');

  const summarizeText = async () => {
    try {
      const response = await axios.post(`${process.env.REACT_APP_BACKEND_URL}/api/summarize`, { text: inputText });
      setSummary(response.data.summary);
    } catch (error) {
      console.error('Error calling backend API:', error);
    }
  };

  return (
    <div>
      <h1>Text Summarizer</h1>
      <textarea rows="10" cols="50" value={inputText} onChange={(e) => setInputText(e.target.value)}></textarea>
      <br />
      <button onClick={summarizeText}>Summarize</button>
      <h2>Summary:</h2>
      <p>{summary}</p>
    </div>
  );
};

export default App;
Step 4: Set Up the Express Server
Now, let’s configure the backend with Express. First, create a server directory for your backend:
mkdir server
cd server
npm init -y
npm install express axios body-parser dotenv mongoose cors
Create an .env file in the server directory and include your OpenAI API key and MongoDB URI:
OPENAI_API_KEY=your_openai_api_key
MONGODB_URI=your_mongodb_connection_uri
Step 5: Create the Server File
In the server/server.js file, configure the backend server:
require('dotenv').config();
const express = require('express');
const axios = require('axios');
const bodyParser = require('body-parser');
const mongoose = require('mongoose');
const cors = require('cors');

const app = express();
const PORT = process.env.PORT || 5000;

app.use(bodyParser.json());
app.use(cors());

const OPENAI_API_KEY = process.env.OPENAI_API_KEY;

// Connect to MongoDB
mongoose.connect(process.env.MONGODB_URI, { useNewUrlParser: true, useUnifiedTopology: true });

// Schema for summaries
const summarySchema = new mongoose.Schema({ text: String, summarizedText: String });
const Summary = mongoose.model('Summary', summarySchema);

app.post('/api/summarize', async (req, res) => {
  const { text } = req.body;
  try {
    const response = await axios.post('https://api.openai.com/v1/chat/completions', {
      model: 'gpt-3.5-turbo',
      messages: [{ role: 'user', content: text }],
      temperature: 0.7,
      max_tokens: 64,
    }, {
      headers: { Authorization: `Bearer ${OPENAI_API_KEY}` }
    });

    const summarizedText = response.data.choices[0].message.content;
    const newSummary = new Summary({ text, summarizedText });
    await newSummary.save();

    res.json({ summary: summarizedText });
  } catch (error) {
    console.error('Error:', error);
    res.status(500).json({ error: 'Internal Server Error' });
  }
});

app.listen(PORT, () => {
  console.log(`Server is running on port ${PORT}`);
});
Step 6: Run the Development Servers
Open two terminal windows. Start the Express server on a terminal:
cd server
node server.js
In the other terminal, start the React development server:
cd summarizer-app
npm start
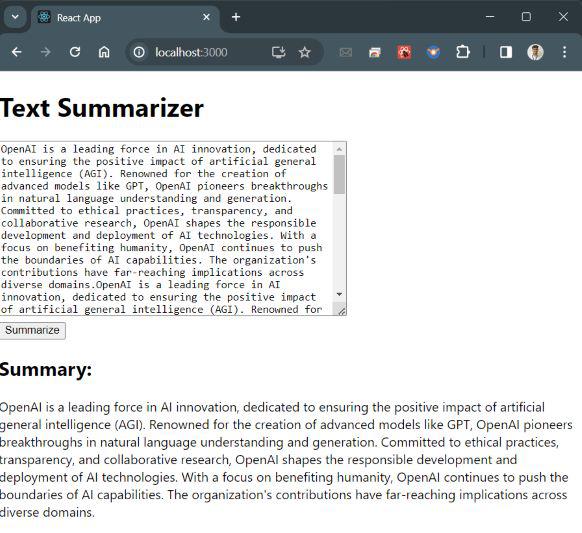
Output:
To see the summary website up and running, navigate to http://localhost:3000 in your browser. Enter any text and view its summary using the OpenAI GPT-3.5 image!
Conclusion
After these steps, you have successfully created a Summarizer Website using the MERNA stack and integrated it with the OpenAI API. This work can form the basis for more advanced applications where information processing is needed, such as text processing or automated spreadsheets.

